Getting Started
Installation
Requirements
- AWS account
- At least one ElastiCache Memcached cluster
Install via AWS Marketplace
The following instructions will guide you through installing CacheSight from the AWS Marketplace.
CacheSight is available as an Amazon Marketplace Image (AMI). The AMI is used to create and provision a new EC2 instance which CacheSight runs on.
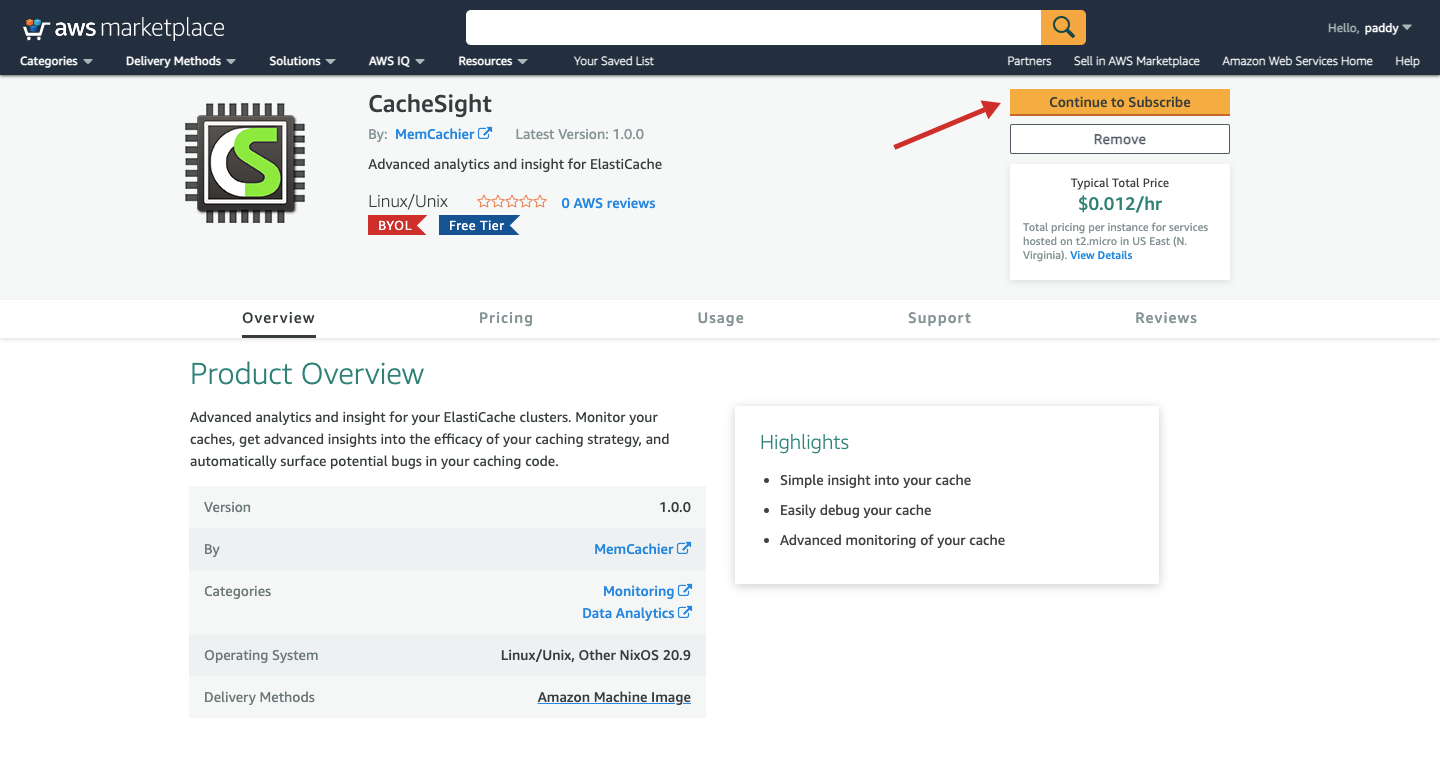
To begin, log in to your AWS account. Then, visit the CacheSight AMI Marketplace listing.
Click Continue to Subscribe to start launching your CacheSight instance.
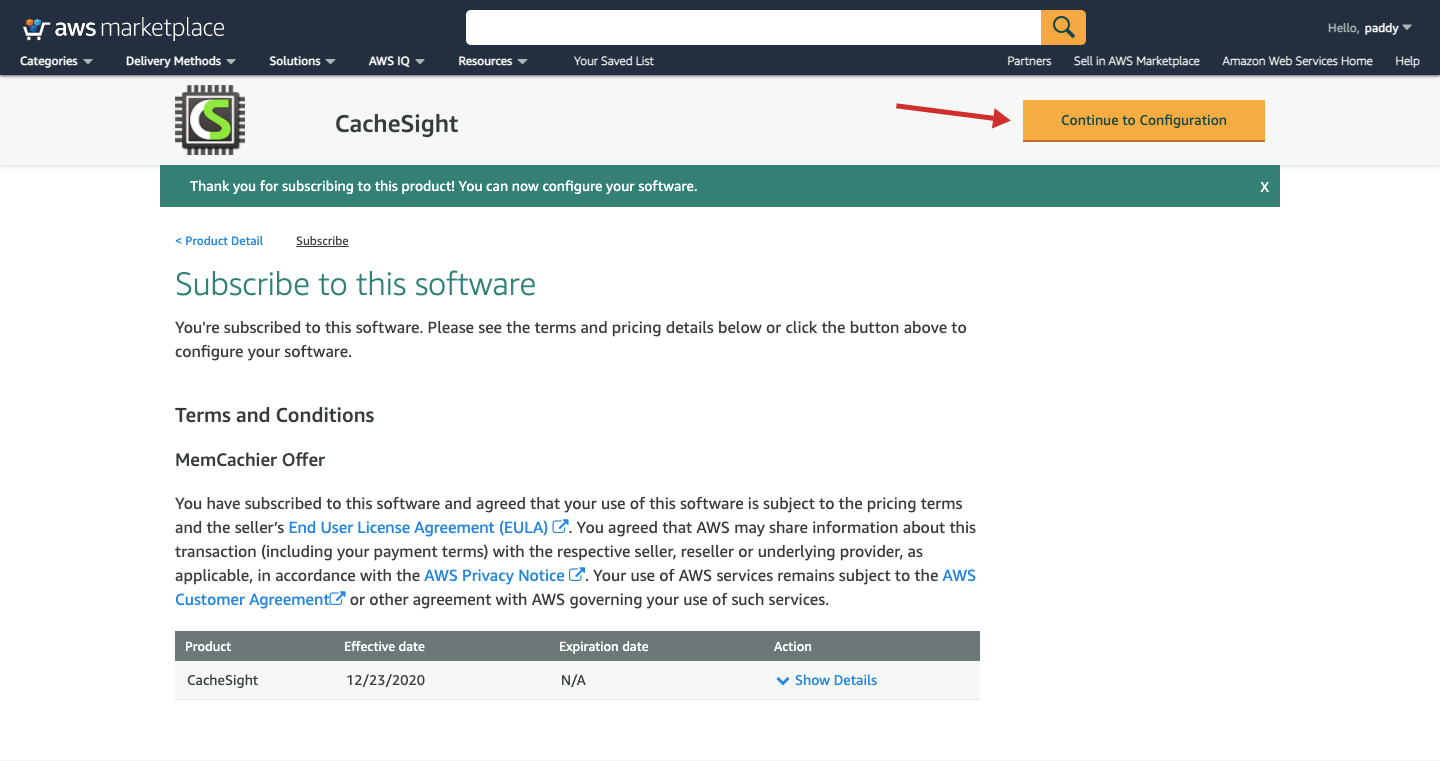
Accept the terms and conditions, if you’re happy with them.

After clicking Accept Terms it could take up to a minute for the your subscription to be ready. When it is, click Continue to Configuration.
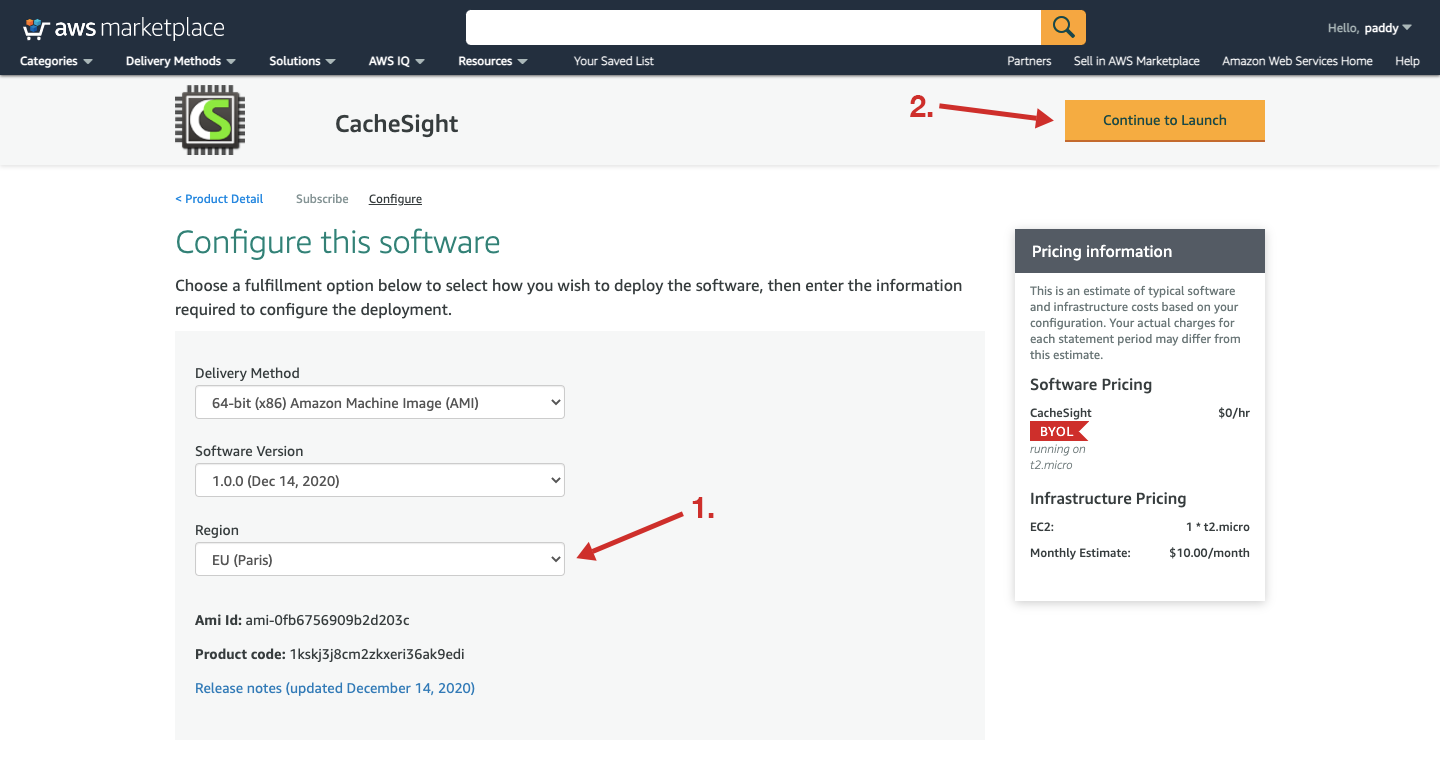
Configure this software
Leave Delivery Method and Software Version as their default values.
Select the region you want CacheSight to be in. Your memcached ElastiCache cluster(s) should be in the same region.
Click Continue to Launch.
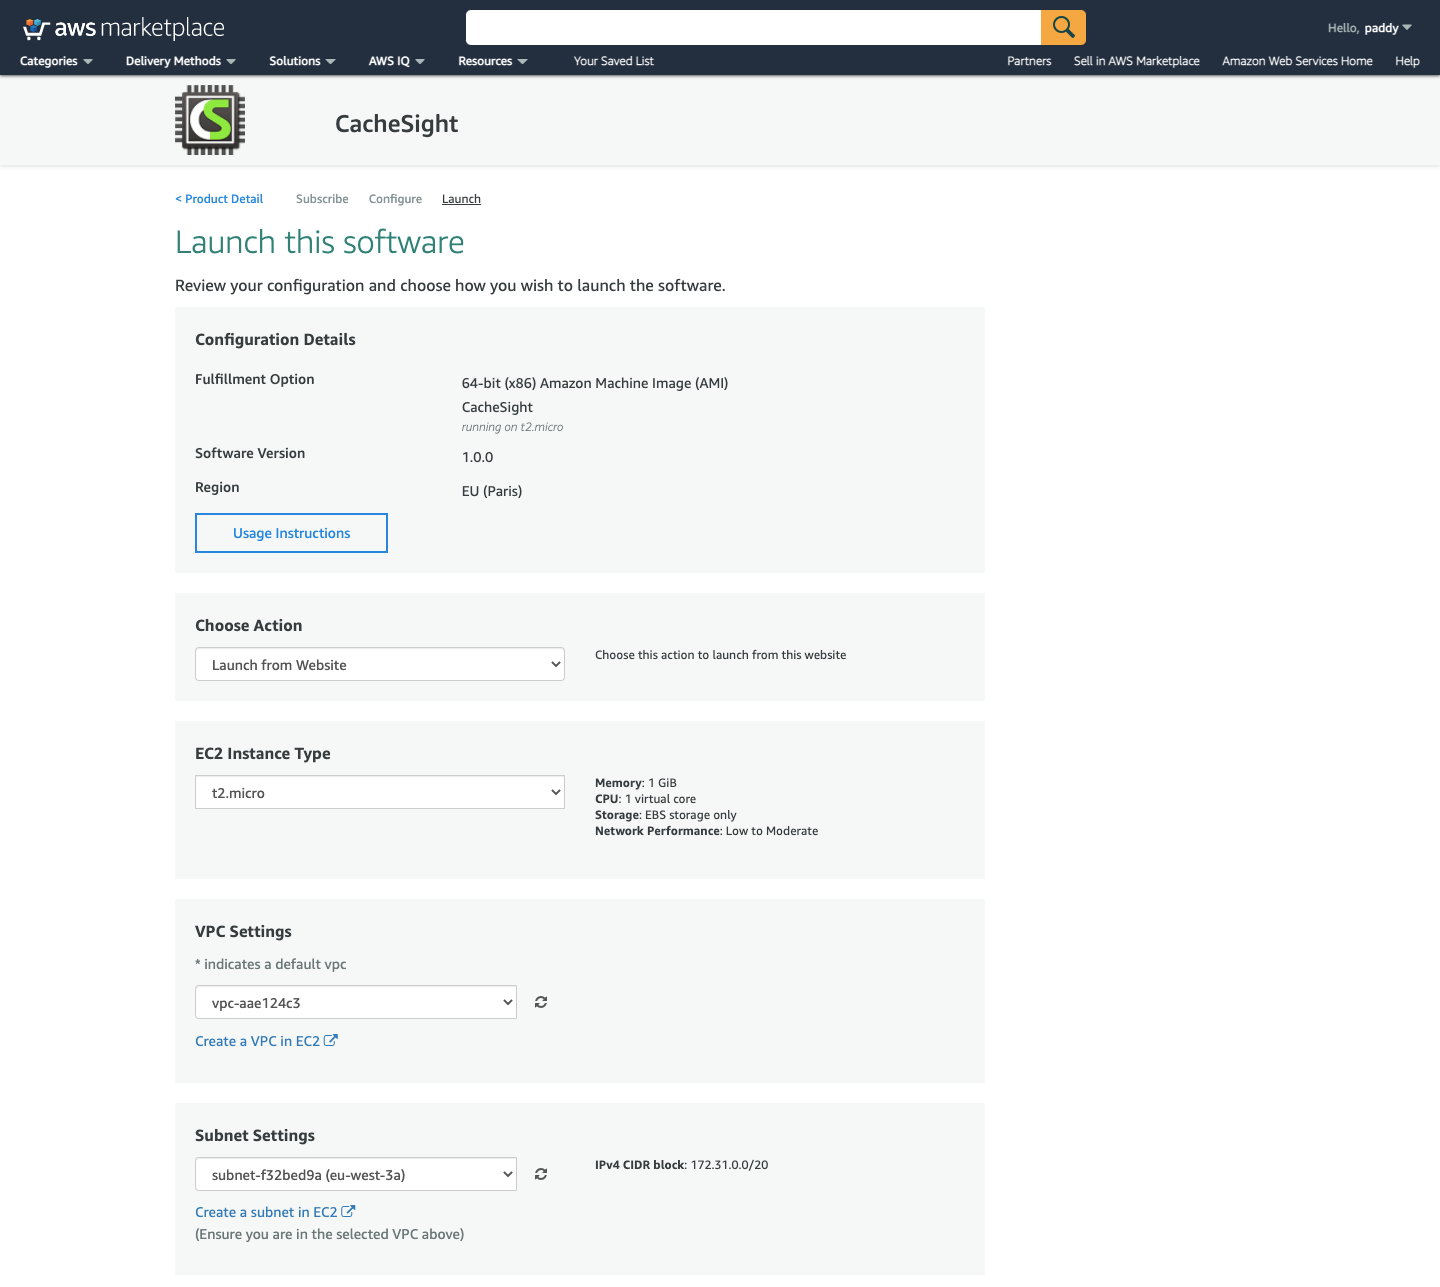
Launch this software
Choose Action
Leave as Launch from Website.
EC2 Instance Type
Leave as t2.micro (our recommended size).
VPC Settings
Your default VPC should work just fine. Otherwise choose your desired VPC.
Subnet Settings
Your default subnet settings should also work fine. Otherwise choose your desired subnet settings.
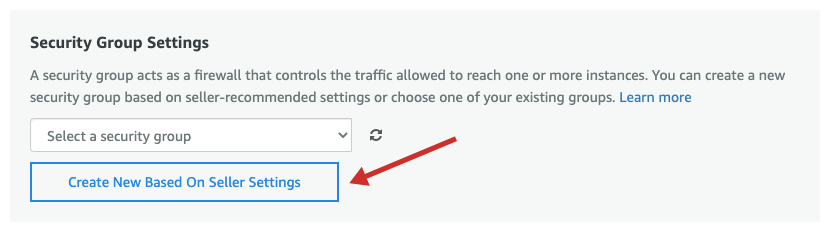
Security Group Settings
Click Create New Based On Seller Settings.
Name your new security group (e.g. ‘CacheSight’) and add a description (e.g. ‘Give access to CacheSight). Then click Save.
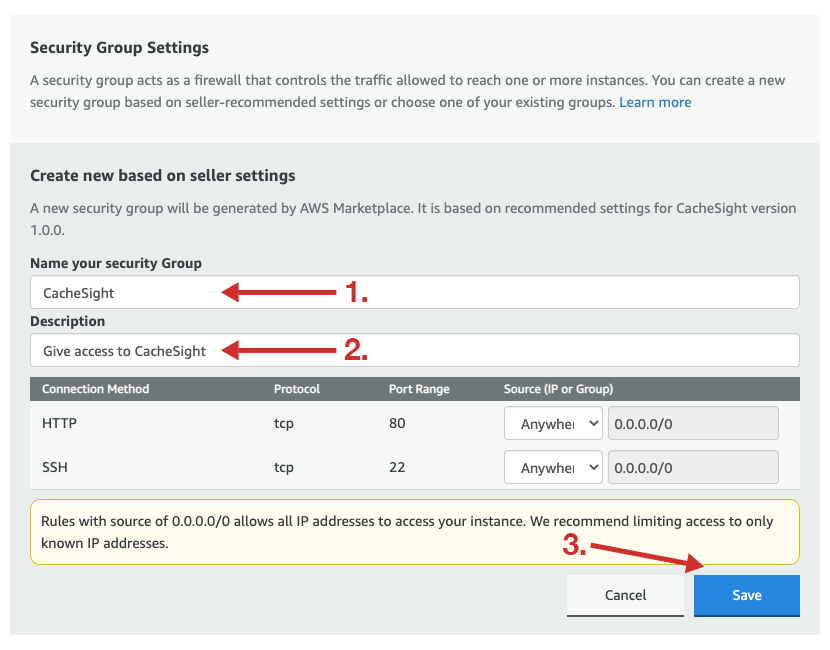
Note, you can also create your own security group, or modify an existing one. CacheSight requires the standard All Traffic outbound rule, and two inbound rules:
- Type: HTTP, port: 80, source: 0.0.0.0/0
- Type: SSH, port: 22, source: 0.0.0.0/0
Also note, if using ElastiCache for Memcached, you will need to give CacheSight access to your ElastiCache cluster.
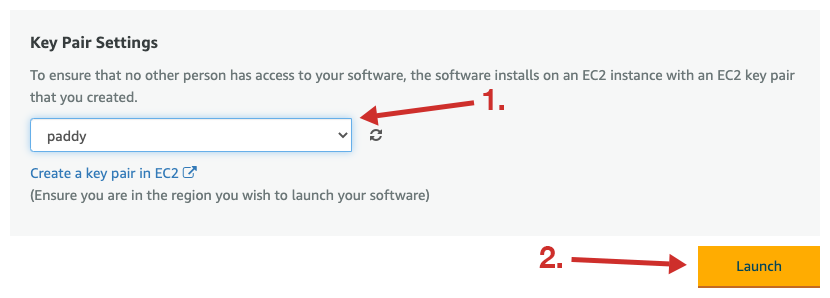
Key Pair Settings
If you already have a key pair you would like to use, select it, and click Launch.
If you do not have a key pair, or would like to create a new one, click Create a key pair in EC2.
That will open the Key Pairs section of your EC2 console in a new tab. From there you can follow these steps to create or import a key pair.
Once you have finished creating your new key pair, return to the previous Marketplace tab to continue installing CacheSight.
Click the refresh icon beside the Key Pair select field to make your new key pair available, then select the key pair, and click Launch.
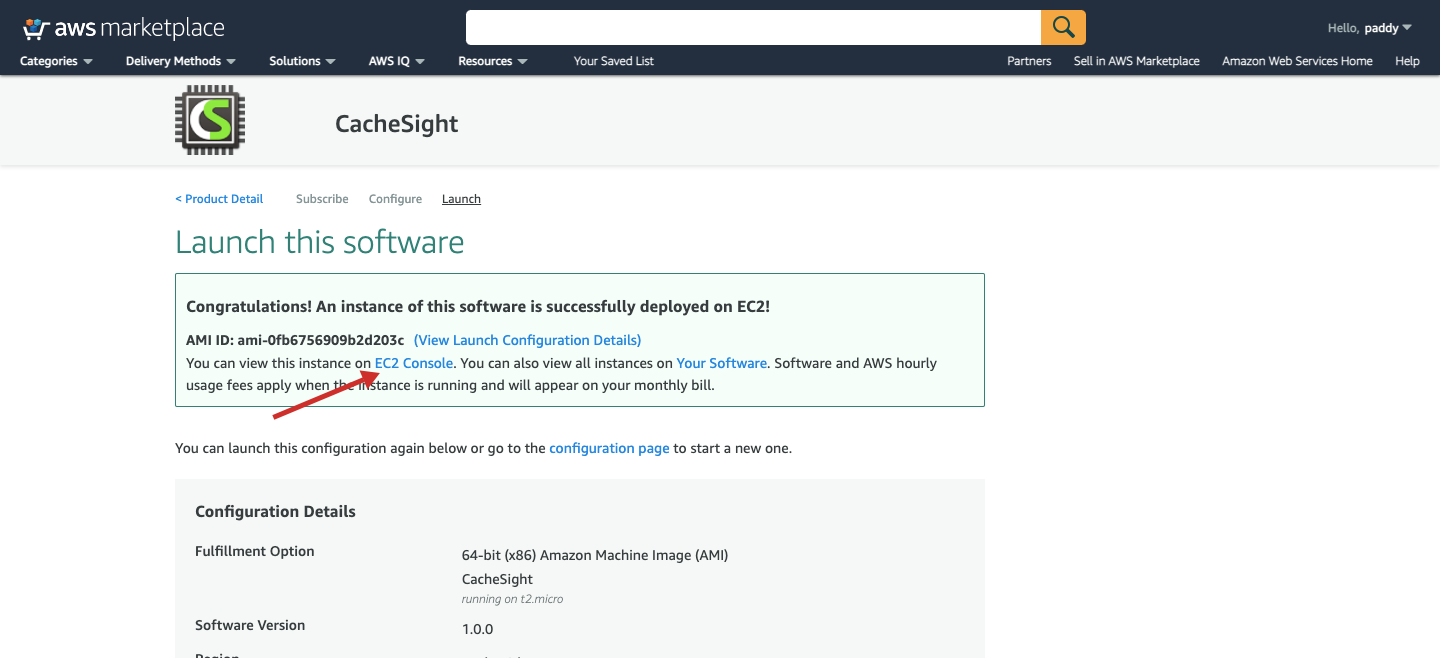
Installation complete
That’s it, CacheSight should be up and running!
You will find your new CacheSight instance on your EC2 console. Click EC2 Console to go directly there.
If using ElastiCache, learn how to give CacheSight access to ElastiCache, otherwise learn how to access CacheSight.
Give CacheSight access to ElastiCache
If using ElastiCache for Memcached, you will need to give CacheSight access to your ElastiCache cluster.
If your CacheSight EC2 instance’ security group is the same as your ElastiCache cluster, CacheSight will automatically have access to your cluster.
However, AWS recommends having separate security groups for your EC2 instance(s) and for your ElastiCache cluster(s). See Accessing an ElastiCache Cluster.
Your ElastiCache cluster’s security group must give inbound access to CacheSight’s security group on the port ElastiCache is running on (11211 by default).
Giving CacheSight access requires two steps.
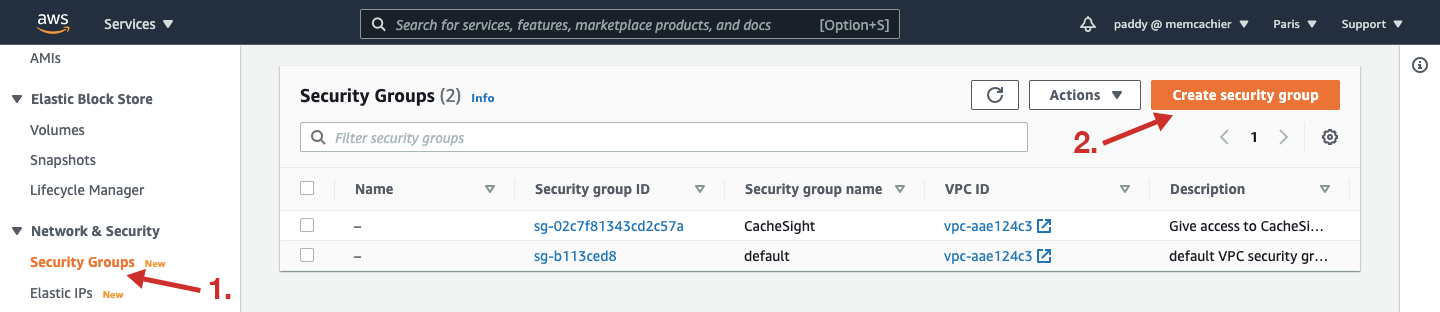
1. Create a security group for ElastiCache
Open the Security Groups section of the EC2 console and click Create security group.
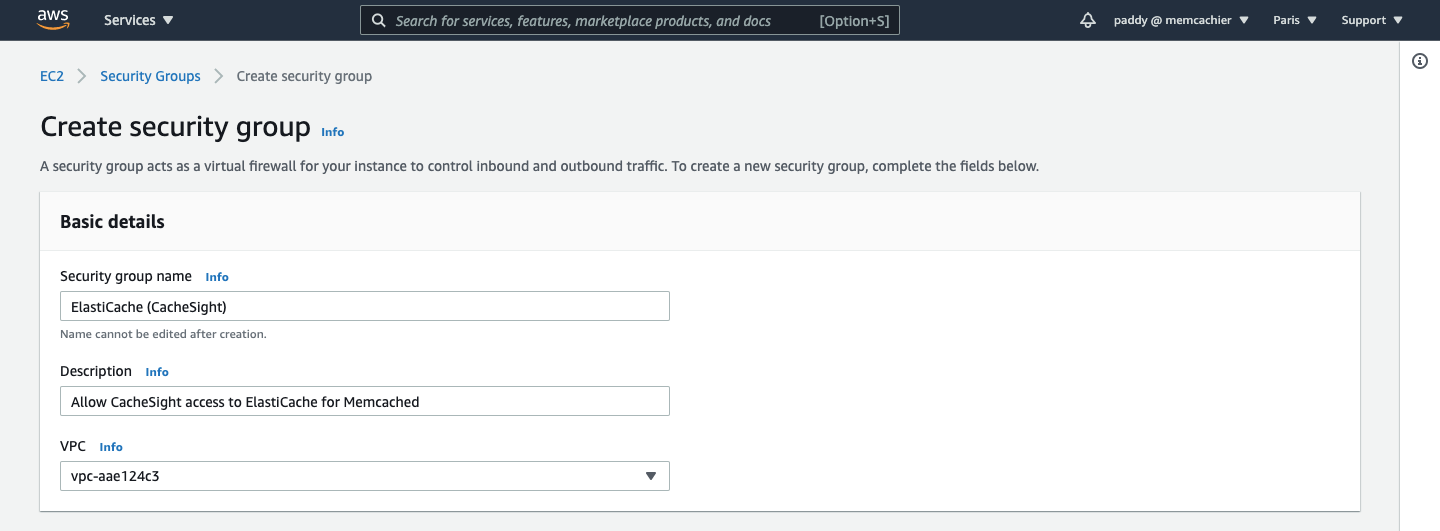
Enter a Security group name (e.g. ‘ElastiCache (CacheSight)’) and a Description (e.g. ‘Allow CacheSight access to ElastiCache for Memcached’).
The default VPC should work just fine. Otherwise choose your desired VPC.
Add an inbound rule. Set Type to Custom TCP, Port to 11211 and Source to your CacheSight security group. My CacheSight security group is named ‘CacheSight’.

Finally, click Create security group.
2. Add the security group to your ElastiCache
Open the ElastiCache console. Select the Memcached section and select the desired cluster.
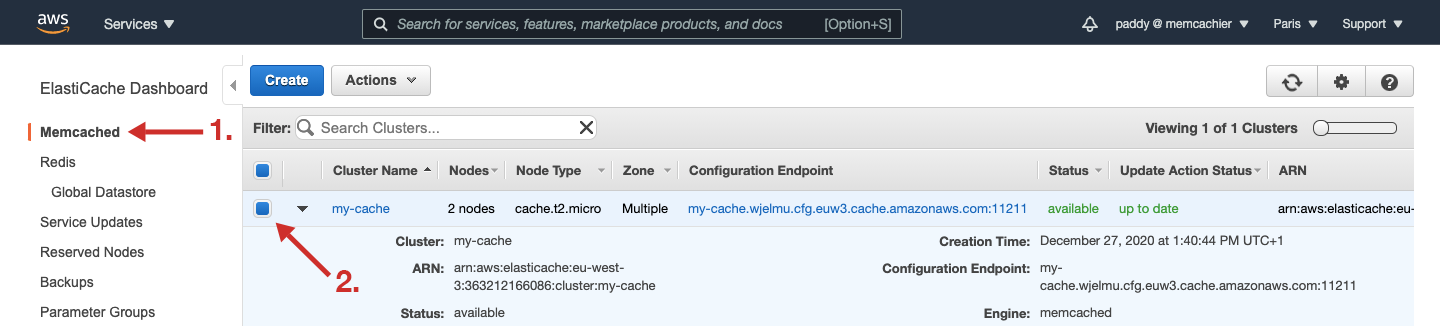
Next, click Actions, then Modify.
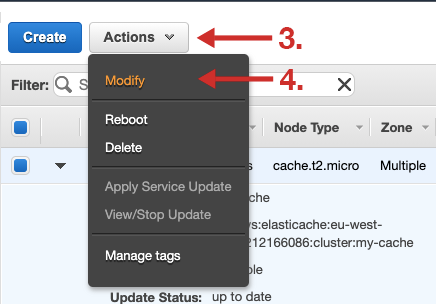
Edit VPC Security Group(s).
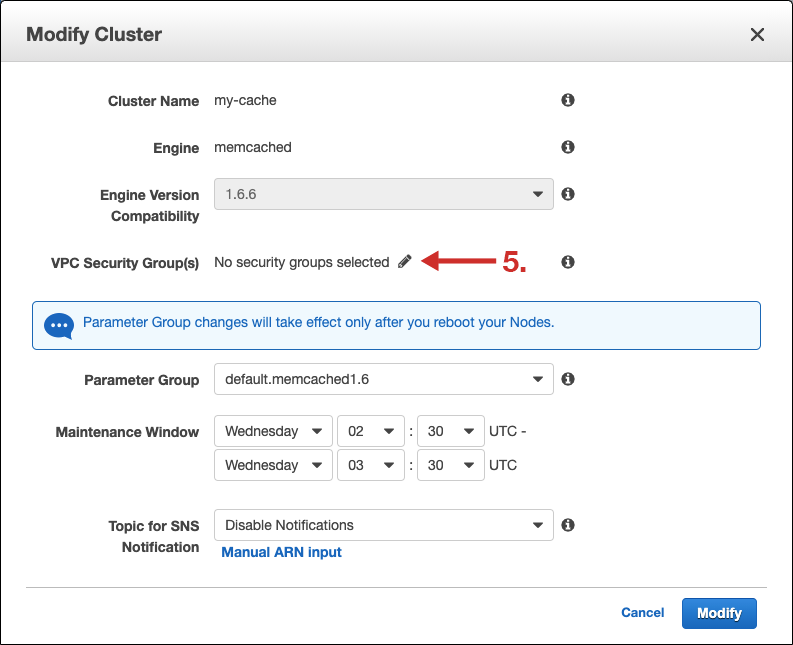
Finally, select your security group, click Save, then Modify.

CacheSight should now have access to your ElastiCache.
Machine sizing
The recommended EC2 machine size for running the CacheSight AMI will depend on the activity of your cache(s). In general, we recommend the following AWS instance sizes for a given maximum of total requests per second (summed up over all caches).
| max. total requests per second | instance |
|---|---|
| 5,000 | t3.micro |
| 20,000 | t3.small |
| 50,000 | t3.medium |
| 110,000 | m5.large |
| 230,000 | m5.xlarge |
| 400,000 | m5.2xlarge |
| 800,000 | m5.4xlarge |
| 1,600,000 | m5.8xlarge |
| 2,400,000 | m5.12xlarge |
| 3,200,000 | m5.16xlarge |
| 4,800,000 | m5.24xlarge |
For an individual recommendation based on your caches and number of requests, please contact our team at support@cachesight.com.
Per cache limit
The requests per second of a single cache cannot exceed 140,000.
If you need introspection for a cache with more than 140,000 requests per second, please contact our team at support@cachesight.com.
Access CacheSight
To access CacheSight, once installation is complete, visit the Public IPv4 address of your CacheSight EC2 instance in a web browser.
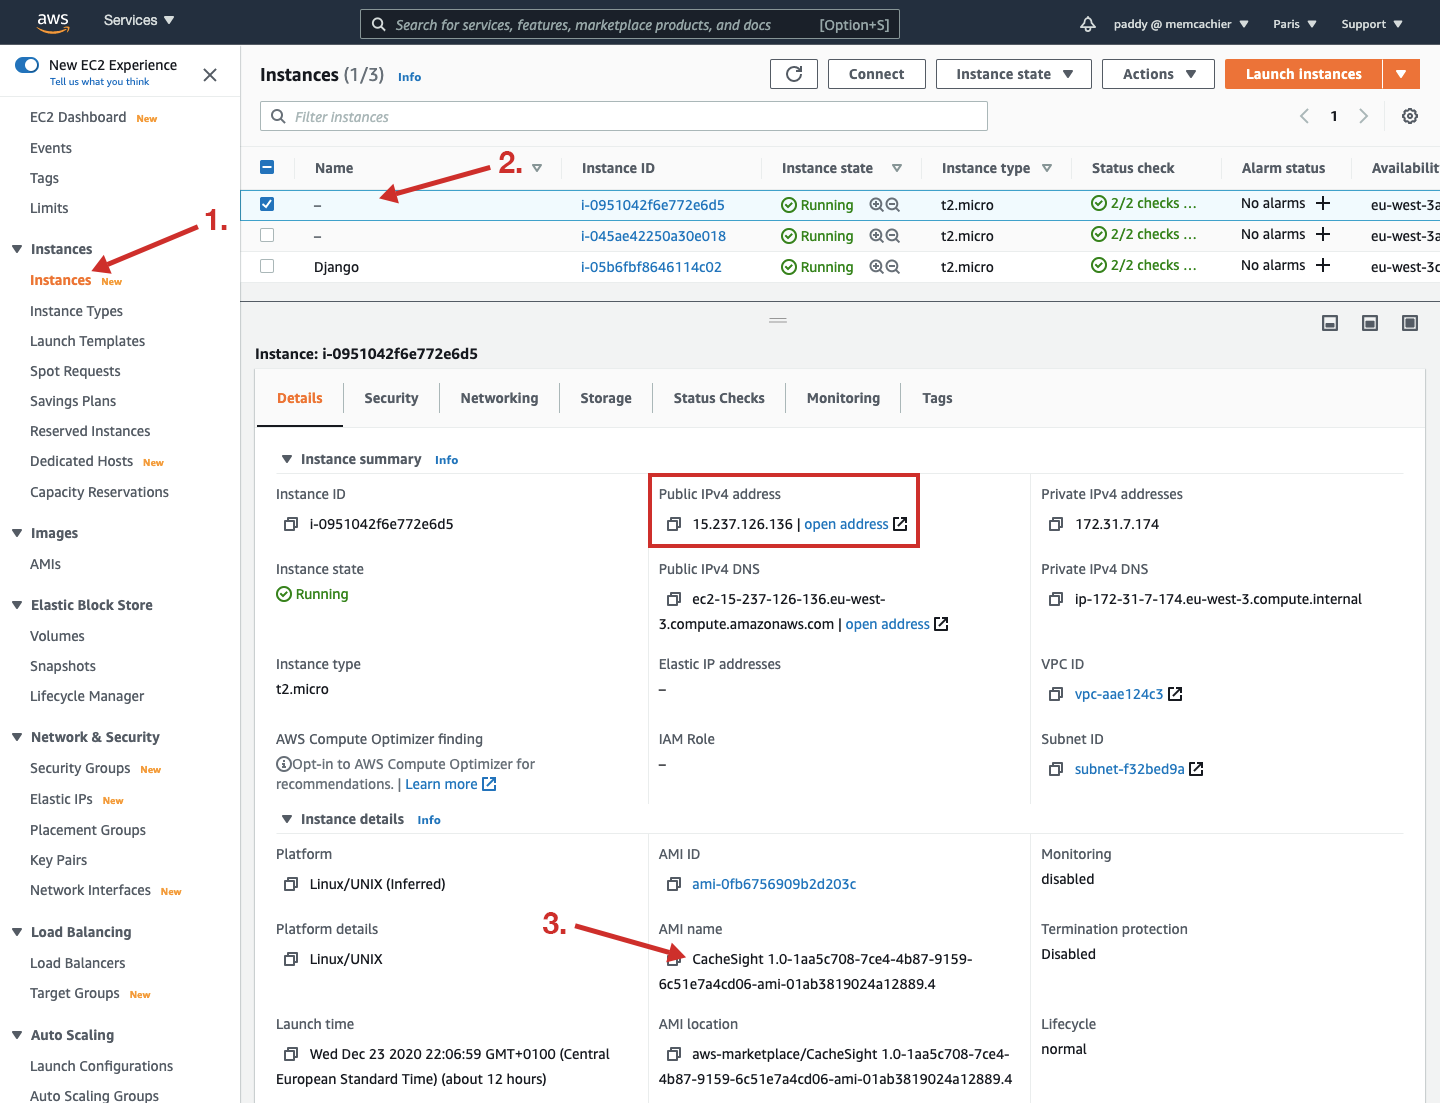
To find the Public IPv4 address, visit your EC2 console and do the following:
- View the Instances section of the EC2 console.
- Select your CacheSight instance (which will not have a name initially. You can name it whatever you like).
- In the instance Details tab, confirm the correct instance is selected by checking its AMI Name begins with ‘CacheSight’.
- Find your Public IPv4 address in the Details tab, as highlighted in the screenshot below.
Make sure you are in the same region you launched CacheSight in.
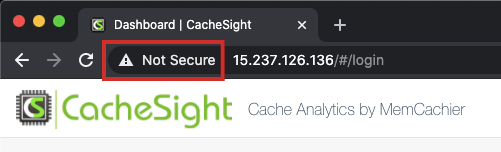
‘Not Secure’
Note, CacheSight is accessed using the Public IPv4 address of your CacheSight EC2 instance over http, not https. As a result some browsers may display a Not Secure notice in the address bar, which is normal and does not indicate an issue.
For example, http://54.170.145.227.
Note, if CacheSight does not load in your browser and times out, make sure to explicitly specifying
http://in the address bar, e.g.http://54.170.145.227. If you paste just the IP address, the browser might try to connect over HTTPS, causing a connection timeout.
In order to access a site via https, an SSL certificate would be required, which in turn would require a domain name. CacheSight currently runs only over http because we access it via an IP address, not a domain name.
Sign in
When you access CacheSight you will need to sign in (if you’re not already signed in of course).
To sign in to Cachesight, enter your password and click SIGN IN.
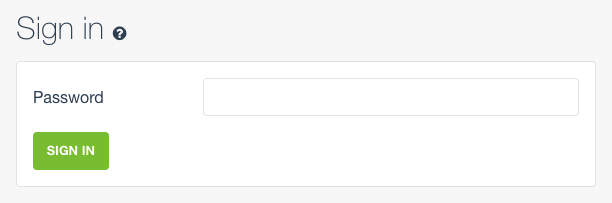
Default password for first time sign in
If signing in to CacheSight for the first time, the default password will be your EC2 instance ID, e.g. i-05b6fbf8646114c02.
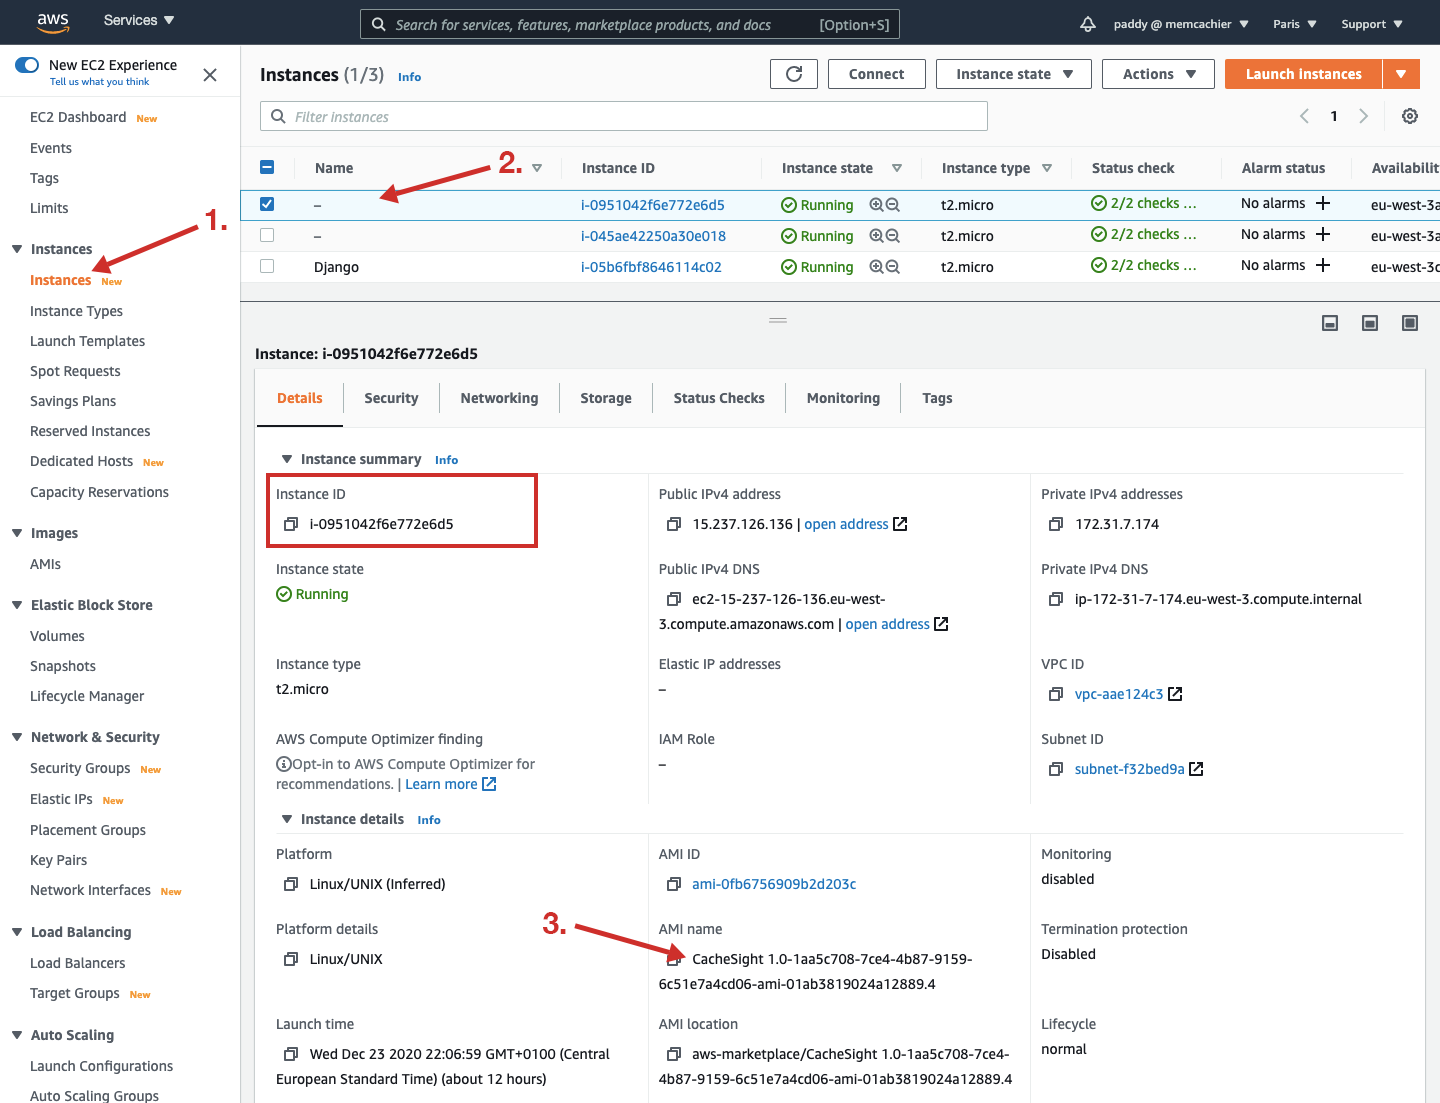
Finding your instance ID
To find your Instance ID, visit the EC2 console and do the following:
- View the Instances section of the EC2 console.
- Select your CacheSight instance (which will not have a name initially. You can name it whatever you like).
- In the instance Details tab, confirm the correct instance is selected by checking its AMI Name begins with ‘CacheSight’.
- Find your Instance ID in the Details tab, as highlighted in the screenshot below.
Make sure you are in the same region you launched CacheSight in.
After signing in for the first time you will be required to change the default password for security purposes.
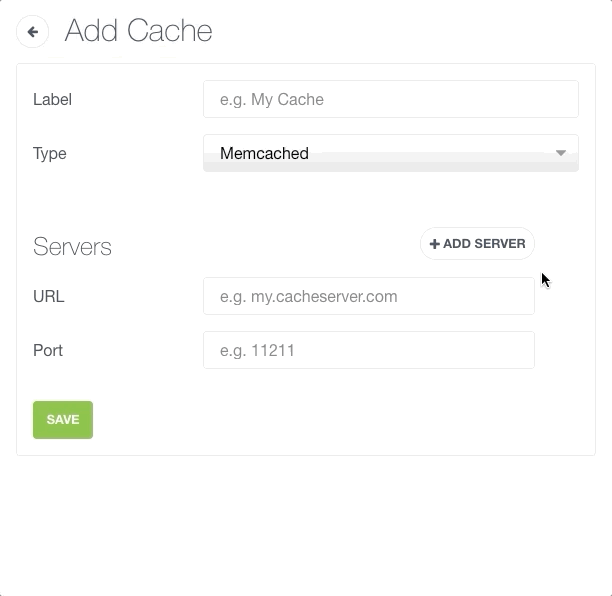
Adding a cache
To add a cache, go to the Caches view. Then, click the ADD CACHE button.

Add a label for your cache, and select a cache type. Currently we support Memcached, which includes ElastiCache for Memcached.
Next, add at least one server. Servers require a URL and a port.
To add additional servers, click the ADD SERVER button.
Supporting ElastiCache auto discovery is on our road map!
Once there are at least two servers, a trash icon button will appear beside each set of server fields. Clicking the trash icon will remove a set of fields.
Finally click SAVE to add your cache.
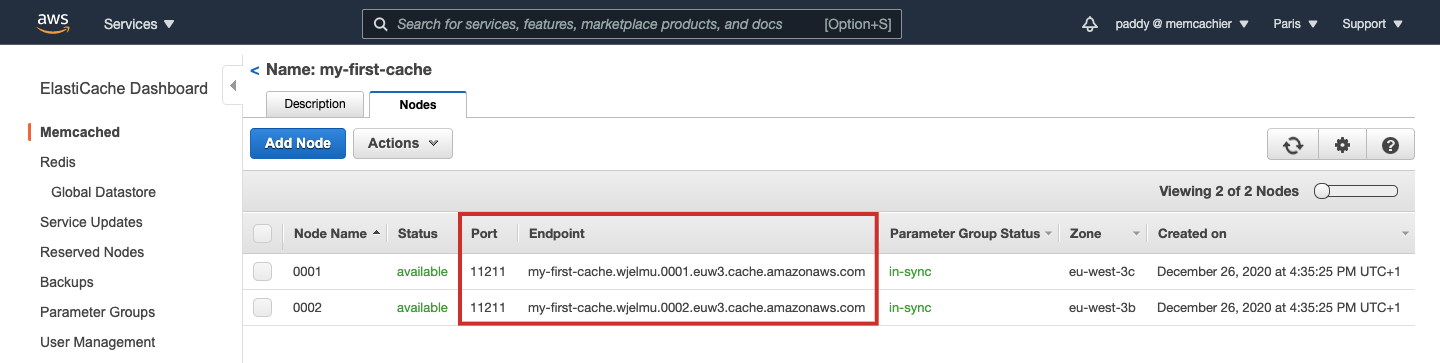
How to find your ElastiCache servers (nodes)
You can find your ElastiCache server URLs on your ElastiCache console.
Select the Memcached section and click on the cluster you want to add to CacheSight. This will reveal a list of nodes which are your Memcached servers.

The Endpoint is your server URL.
Navigate CacheSight
Once a cache has been added to CacheSight, click on its name from the Caches view to see its monitoring dashboard.
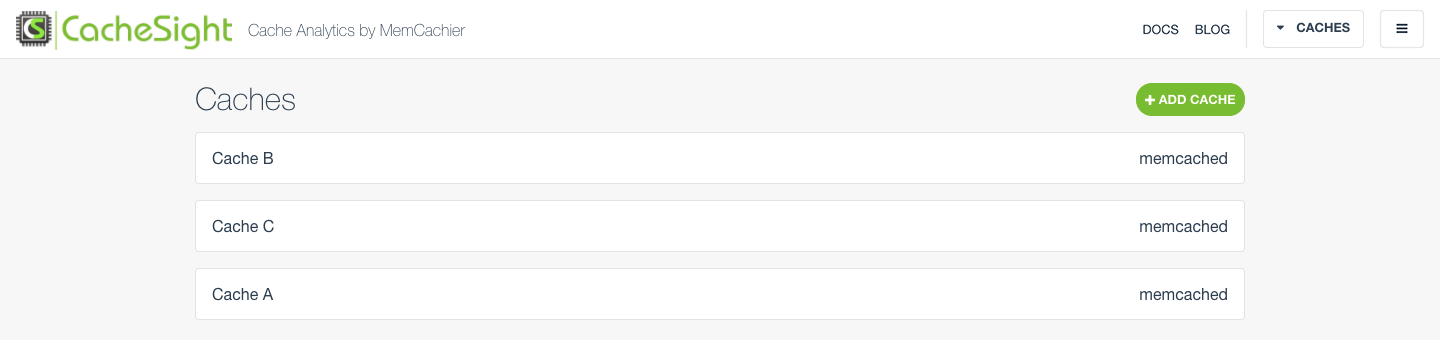
To view all caches again or to switch to another cache, use the CACHES dropdown menu, top right.